This manual provides brief instructions for installing and deploying the gateway.

Please note :
- Observe all safety instructions in this manual.
- Ensure the installation environment complies with the prescribed temperature and humidity limits.
- The gateway is designed for outdoor use up to 2 000 m above sea level.
- Maintain a minimum distance of 20 cm between the antennas and people.
- Do not power the gateway if any RF connector is open or unterminated.
- The purpose of the gateway is to collect and forward LoRaWAN® traffic; do not use it in life‑critical applications.
If the device is installed incorrectly:
- It may not function properly.
- It could be permanently damaged.
- It could pose a risk of injury.
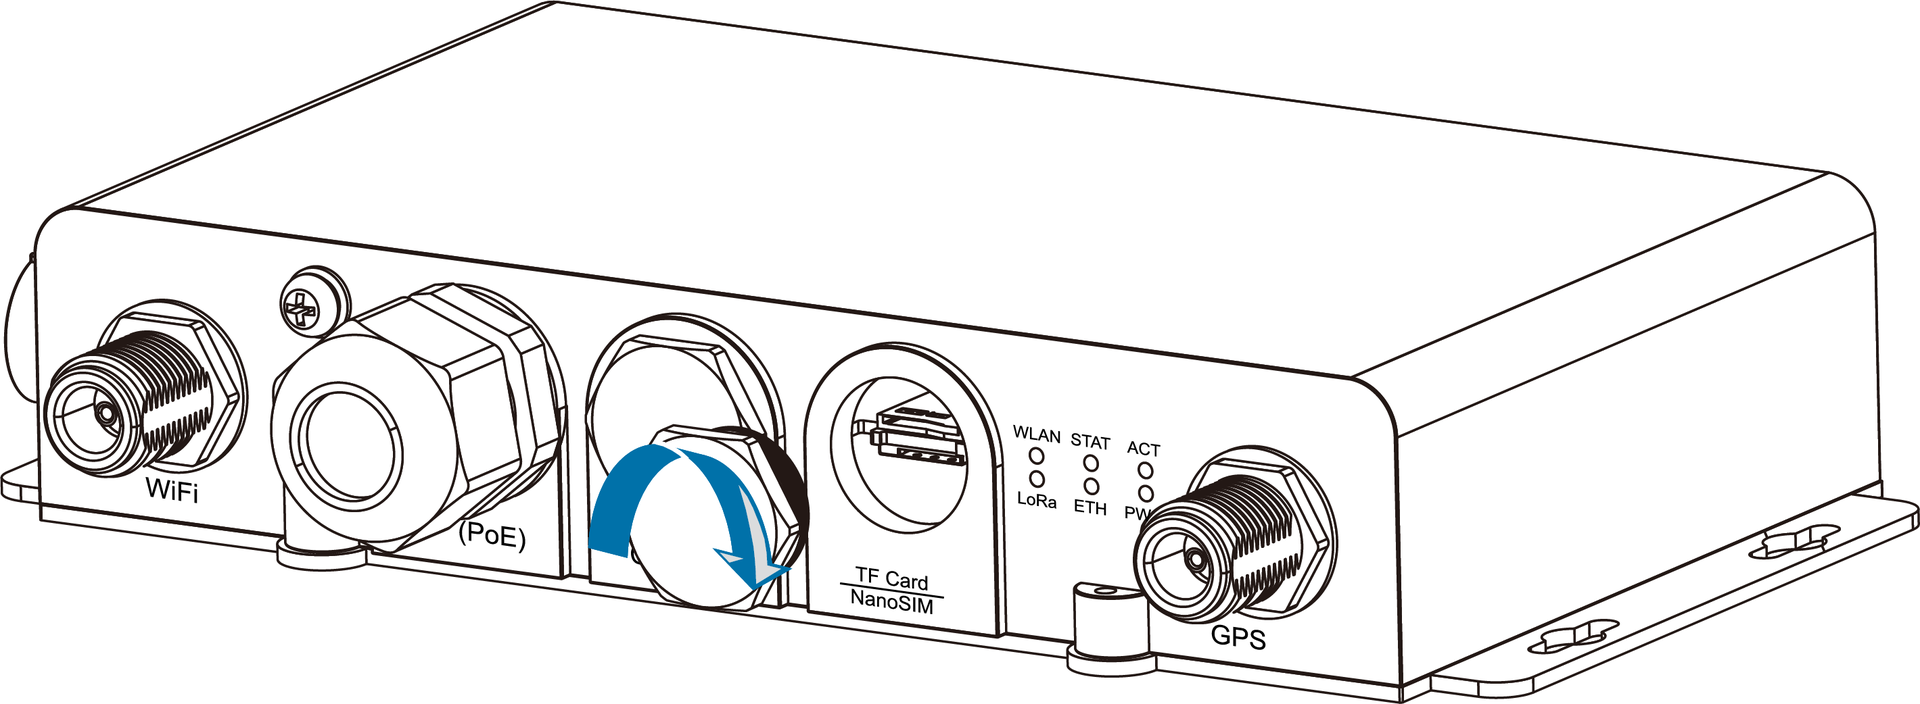
Package Inclusion
👉 Check the package for shipping damage and completeness immediately after receipt
Installation
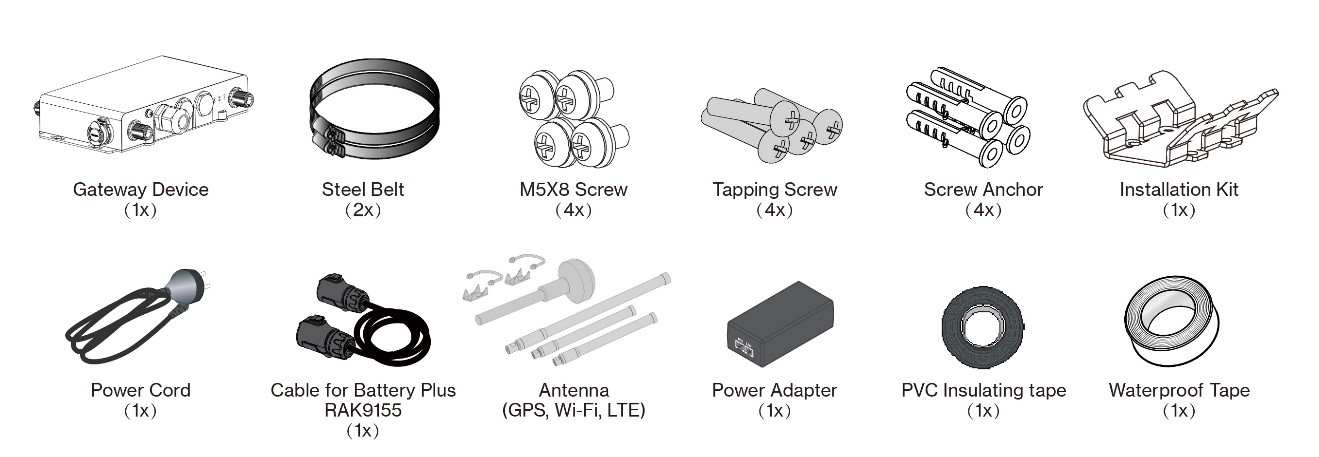
Inserting the SIM card
📢 The SIM card slot of the cellular versions is not hot-swappable. Make sure the gateway is switched off before inserting or ejecting the SIM card.
- Start by unscrewing the cap of the NanoSIM interface on the gateway enclosure to expose the SIM card slot.
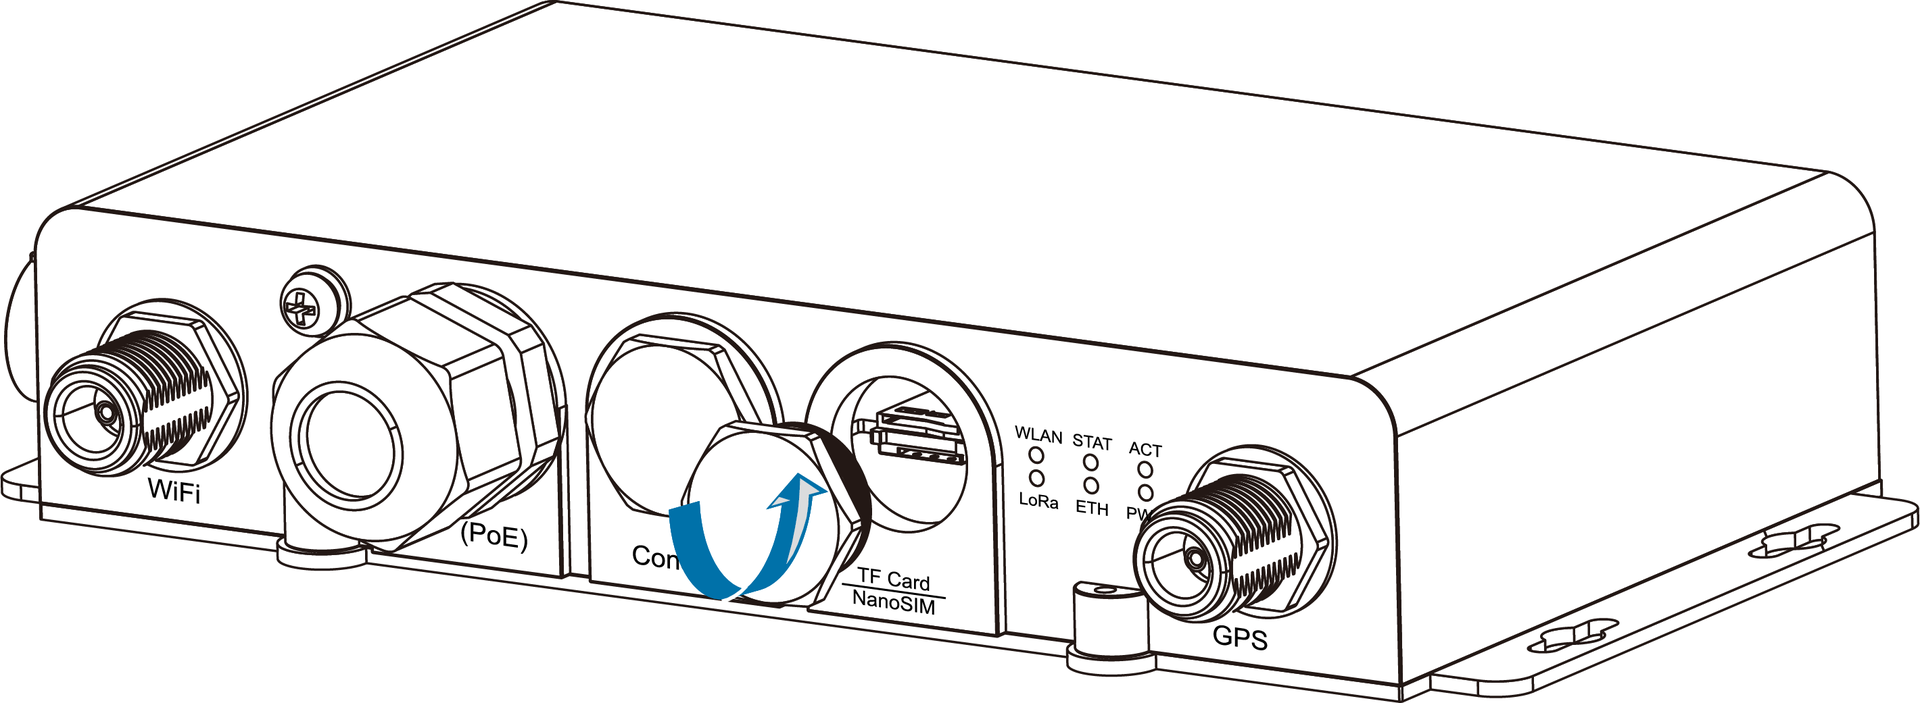
- Push the SIM card into the card slot according to the placement method marked on the interface.
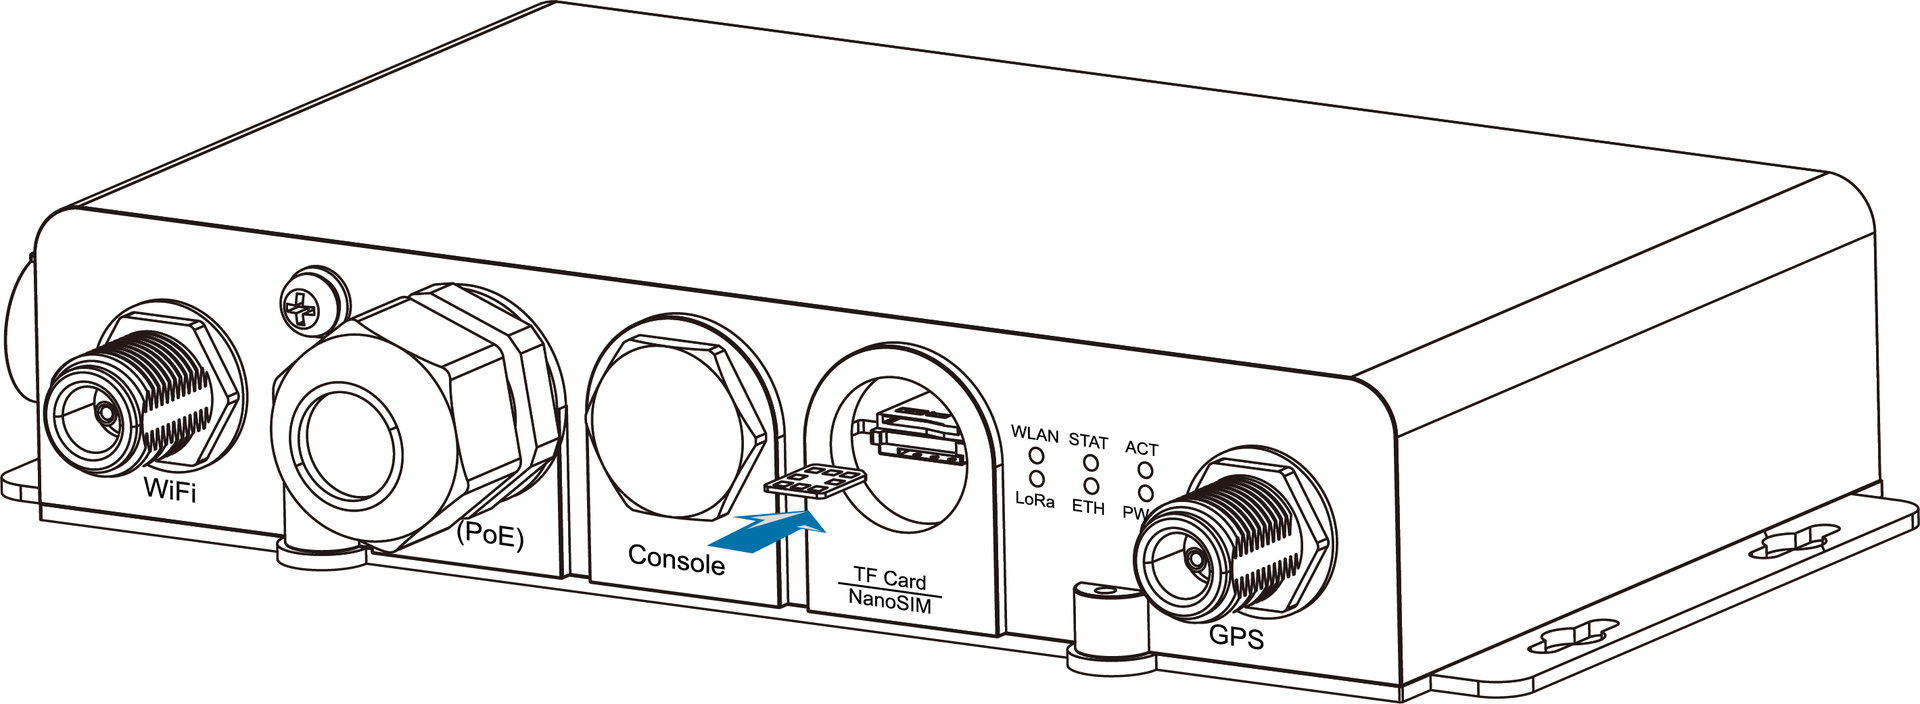
- Once completed, screw back the metal cap. Make sure it is tightly screwed.
Mounting the gateway
- Fix the installation kit at the bottom of the device with four M5 x 8 mm screws.
- Slide the steel band clamps through the rectangular hole of the installation kit. Wrap the band clamps around the pole, lock them, and then tighten the clamps using a screwdriver.

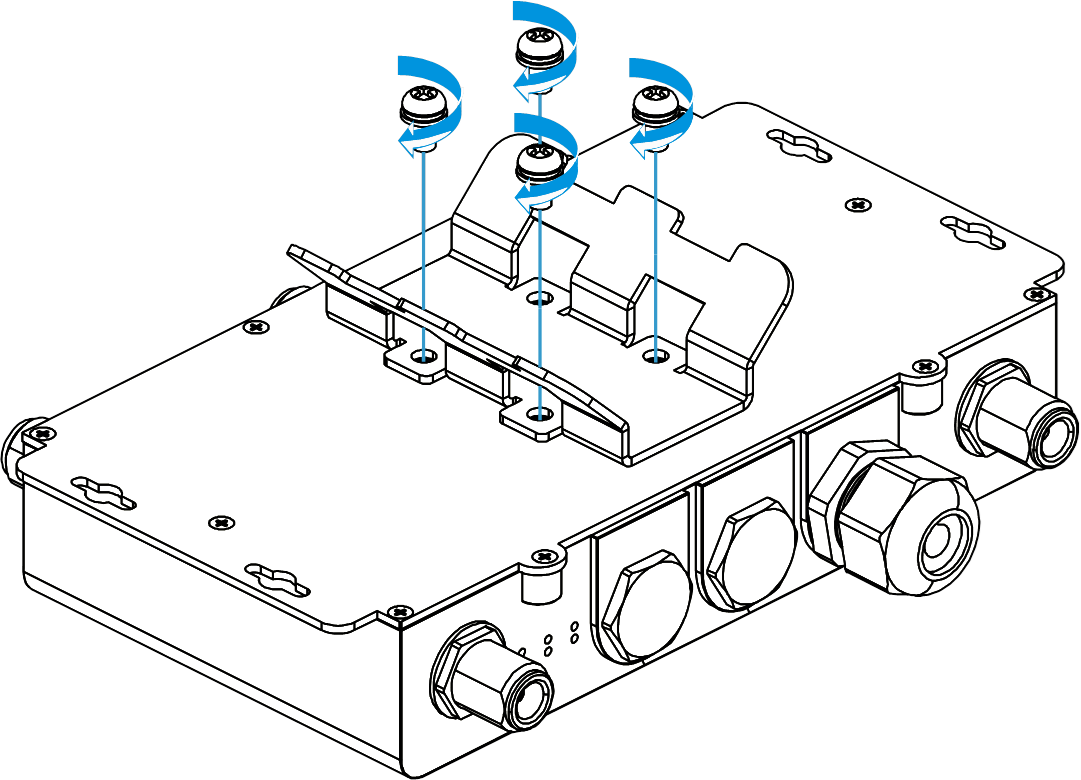
Attach the Antennas
Identify each labelled N‑type port (LoRa, GPS, Wi‑Fi and, on cellular models, LTE‑1 and LTE‑2), screw the matching antenna onto its port by hand until snug, then give it a gentle extra quarter‑turn. Keep every antenna vertical and clear of large metal objects for best radio range
📢 In case you do not desire to use one or more antenna features, make sure to terminate the port with a 50 Ohm load.
Conenct Ethernet & POE
- Plug an outdoor Cat‑5e/6 cable into ETH (PoE).
- Connect the other end to the injector PoE port.
- Optional backhaul: run a second cable from injector LAN to your router/switch.
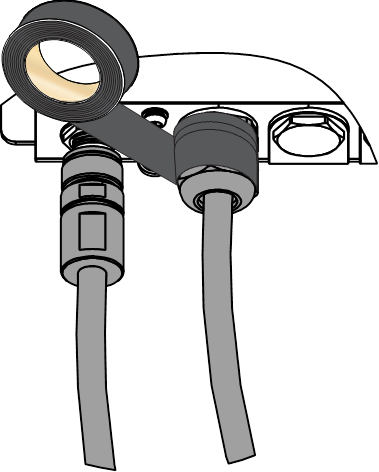
Weather protection
To better protect the Ethernet cable gland and the antenna connector from the weather, you need to cover them with PVC tape.
- Clean the surface area of the connector that will be wrapped. Wrap a layer of PVC tape with a 50% overlap according to the rotation direction of the connector. Continue wrapping the PVC tape to about 10 mm below the end of the connector.
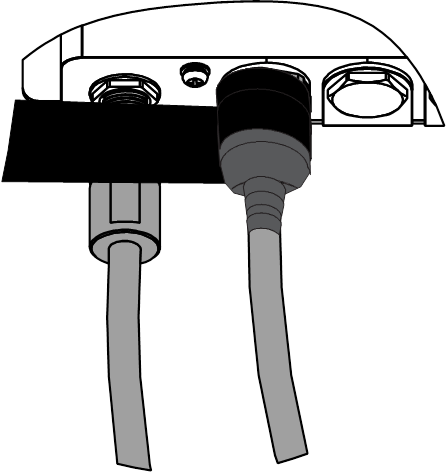
- Cut off about 50 cm waterproof tape. Stretch it to double its length and wrap three layers around the connector with a 50% overlap. Hold the tape in place with your hand for a fewseconds.
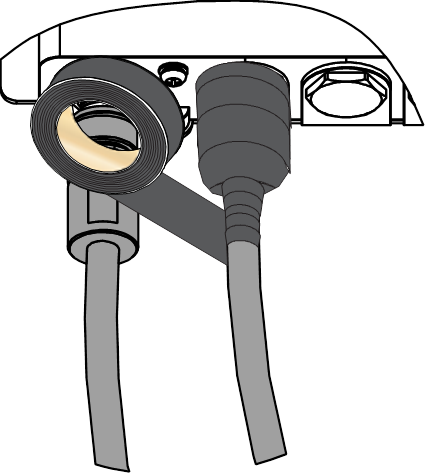
- Wrap three additional layers with PVC tape with natural uncoiling force and a 50% overlap. Ensure to cover the head and the tail of the connector.
Lightning Protection
This section covers the installation of the lightning surge protection system when deploying the SentiGate gateway. Such a protection system must be taken into consideration to ensure a fully functional gateway without interruptions or damage from lightning.
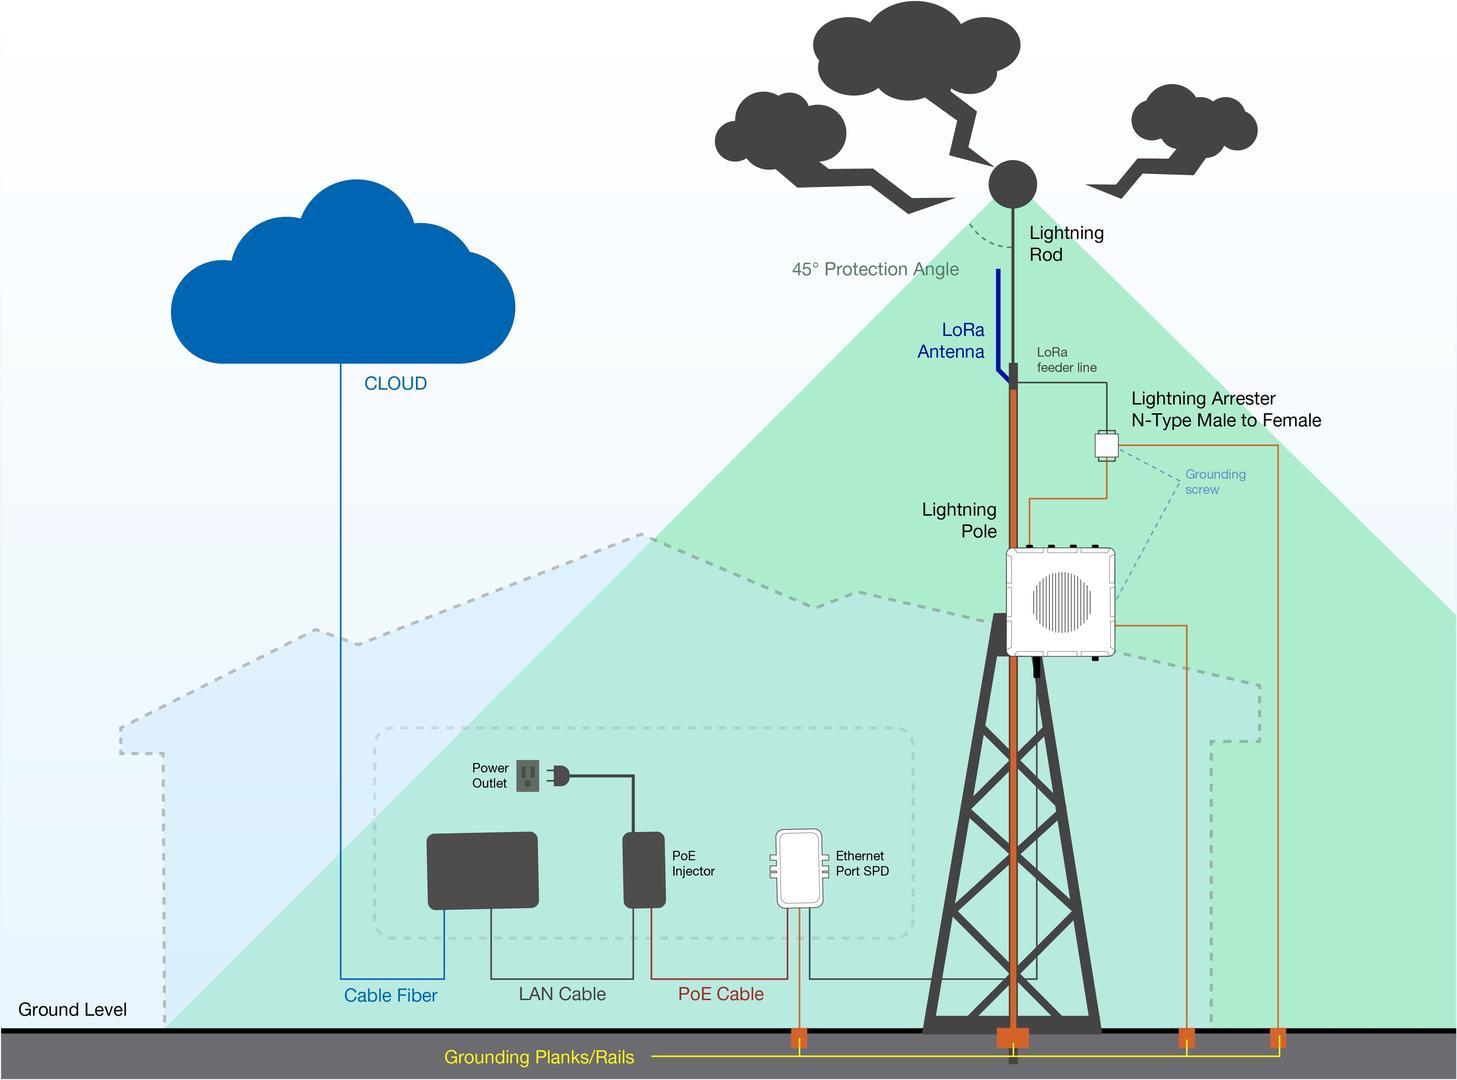
Outdoor Surge Protection System
Antenna Grounding
To protect against lightning strikes, it is highly recommended to install a lightning arrestor on all SentiGate antenna N-type terminals. The arrestors should be N-type Female to Male to ensure compatibility with the antenna and enclosure connectors.
-
Wire Recommendation: Use 10 AWG or better wire to connect the screw terminals of the lightning arrestors to the grounding rail mounted on the building wall or to the grounding bar in field deployments.
Gateway Grounding
In addition to antenna grounding, grounding the SentiGate gateway itself is essential for optimal protection.
-
Grounding Recommendation: Use a 10 AWG or better grounding wire to connect the screw terminal on the bottom side of the SentiGate gateway casing to the grounding rail (or bar).
Indoor Surge Protection
Surge Protection for Indoor Equipment
To protect your indoor equipment connected to the SentiGate gateway, it is recommended to install an Ethernet port SPD (Surge Protection Device) lightning arrestor. This device should be placed along the cable that connects the gateway to the PoE injector. Be sure to connect the arrestor’s grounding wire to a proper grounding point in the building.
❗ Failure to follow these recommendations may result in damage to your equipment due to a lightning strike.
Recommended Equipment
-
Lightning Arrestor for GPS Antenna: Protects the GPS antenna from surges and lightning strikes. It uses a high-pass filter to allow GPS signals while blocking low-frequency interference.
-
Lightning Arrestor for LoRa, LTE, and Wi-Fi Antennas: Protects all antennas from over-voltage and surge currents caused by lightning. Sentinum recommends installing arrestors on all N-type antenna terminals, including LTE and Wi-Fi.
-
Pulsar Cable (LMR-400): Use a Pulsar Cable or equivalent LMR-400 coaxial cable with N-type connectors (N-Type Male to N-Type Female).
-
Signal Surge Protective Device: A surge protection device for Cat5e or Cat6 Ethernet cables. This will protect your equipment from surges and over-voltage, commonly induced by lightning or internal systems
-
Ethernet Cabling: It is recommended to use CAT5e or CAT6 Ethernet cables for outdoor surge protection. These cables should be used for connections between the PoE injector, Ethernet SPD, router/switch, and the Ethernet/PoE port on the SentiGate gateway
Power On the Gateway
❗ Do not power on the gateway if any antenna port is left open. If you do not plan to use one or more of the antenna features, ensure you terminate the unused ports with a 50 Ohm load to avoid damage.
Power Cord + PoE Adapter
The SentiGate gateway is powered through PoE (Power over Ethernet). Ensure you follow the steps outlined in the Connect the PoE Adapter section.
-
Connect one end of the power cord to the PoE adapter.
-
Connect the other end of the power cord to a power outlet.Once this is done, your SentiGate gateway will power on.

Access the SentiGate Gateway
Two methods of accessing the SentiGate gateway are provided, offering flexibility based on available resources.
Wi-Fi AP Mode
By default, the SentiGate gateway operates in Wi-Fi AP Mode. This means you will see an SSID named something like "SentiGate_XXXX" in your PC's Wi-Fi network list, where "XXXX" is the last two bytes of the gateway's MAC address.
- To access the Web Management Platform, enter the following IP address in your web browser: 192.168.230.1
💡 No password is required to connect via Wi-Fi.

- For security reasons, upon the first login, you must set a login password. To do this, enter the desired password and confirm it in the provided fields.
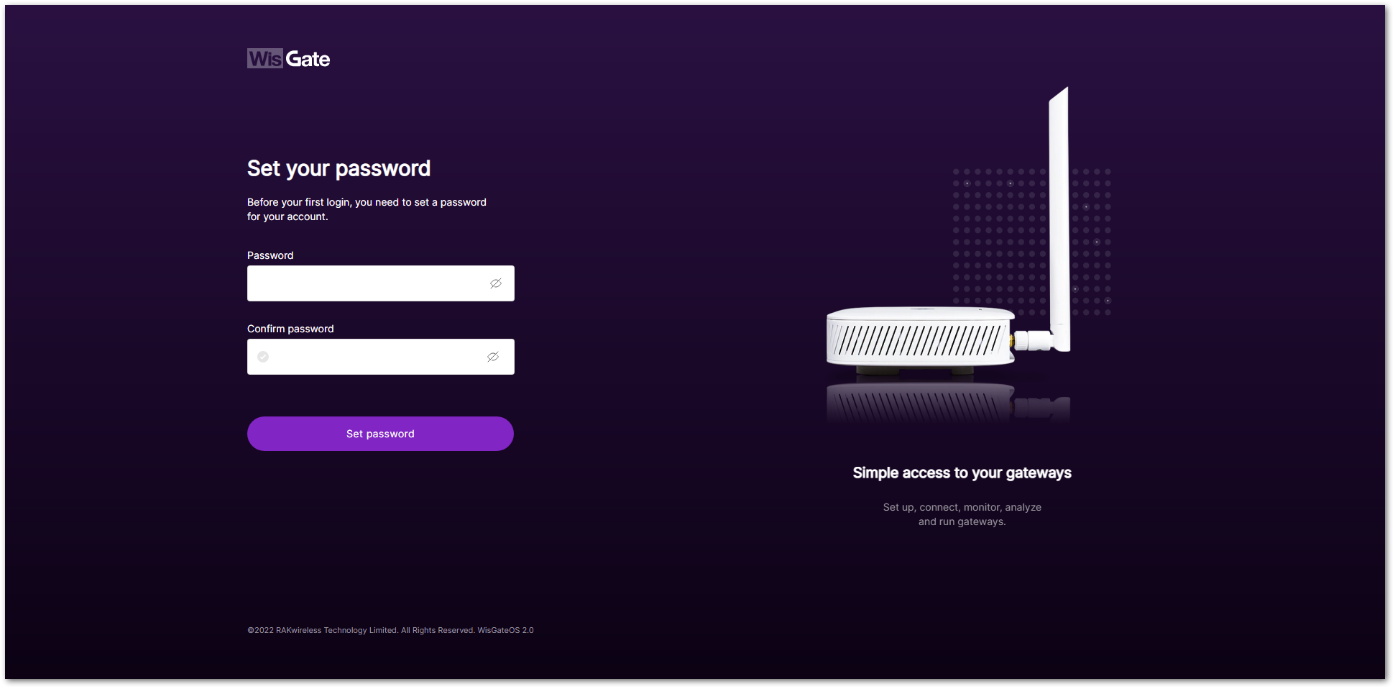
- When the fields are filled in, click the Set password button to apply it. The web UI is now accessible and it will load the LoRaWAN Statistics page.

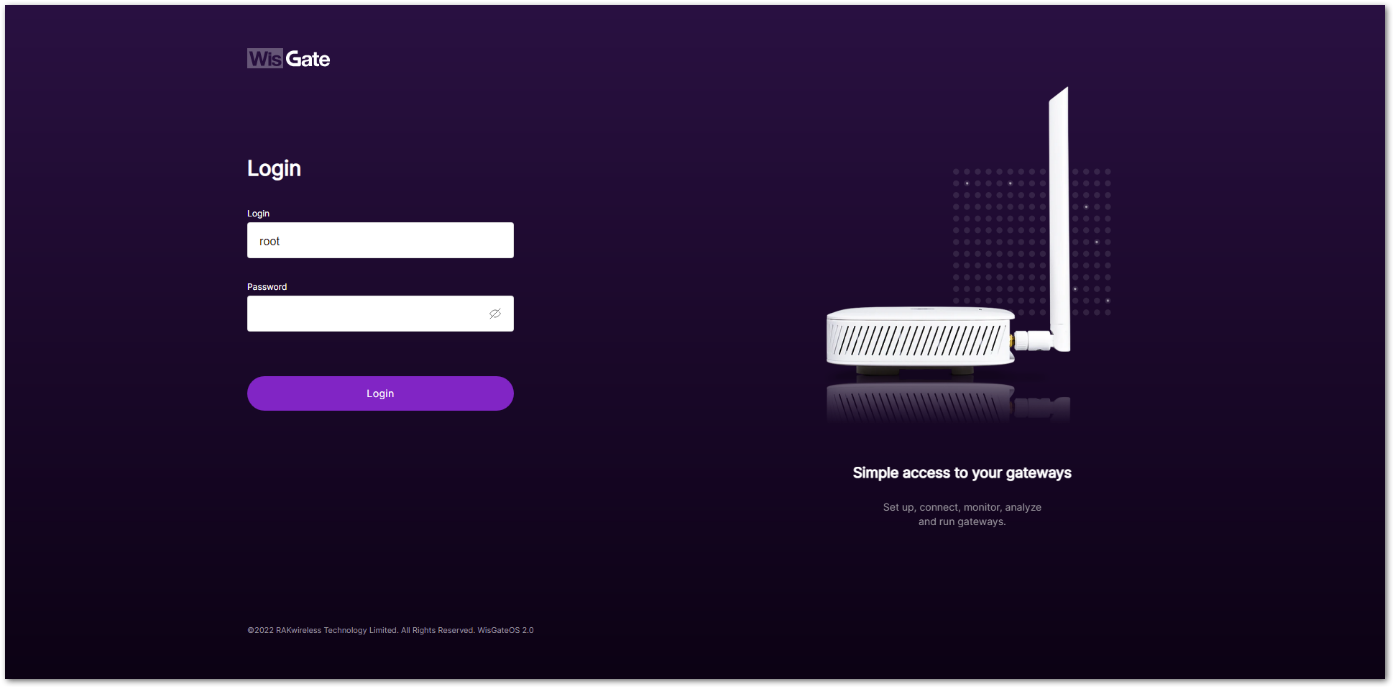
- On the next log in, you need to use the set password for access. The default login username is root.
WAN Port ( Ethernet)
To access the gateway through the ETH (PoE) port, make sure you have completed the steps defined in the Connect the PoE Adapter section.
- Connect one end of another Ethernet cable to the LAN port on the PoE adapter, and the other end to your PC.
💡The default IP is 169.254.X.X. The last two segments(X.X) are mapped from the last four bits of the MAC address of your gateway. For example, the last four bits of the MAC address are 0F:01, and the IP address is 169.254.15.1. Make sure to manually set the address of your PC to one in the same network (for example, 169.254.15.100).
- Open the head to the Ethernet Properties and click the Internet Protocol Version 4 (TCP/IPv4).

- Select Use the following IP address and set the IP address (for example,
169.254.15.100).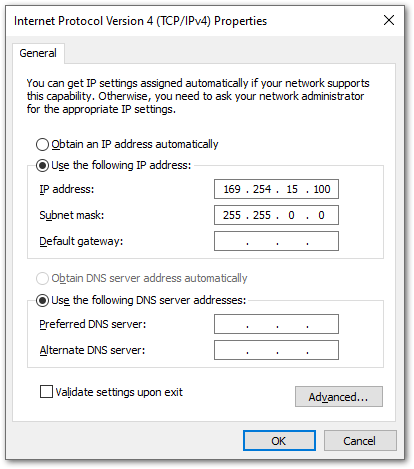
- For security reasons, upon the first login, you must set a login password. To do this, enter the desired password and confirm it in the provided fields.
- When the fields are filled in, click the Set password button to apply it. The Web UI is now accessible, and it will load the LoRaWAN Statistics page.
- On the next log in, you need to use the set password for access. The default login username is root.

Access the Internet
In this section, three methods of accessing the internet are provided to give you different alternatives to choose from, depending on the availability of the necessary requirements.
Connect Through Wi-Fi
- Access the gateway's Web UI, and navigate to Network > WAN > Wi-Fi.
- Expand the Wi-Fi block and click on Settings. Make sure the Interface is enabled.

- You can either click the Scan button to choose your ESSID or manually type the ESSID of the network by clicking enter network (E)SSID manually.
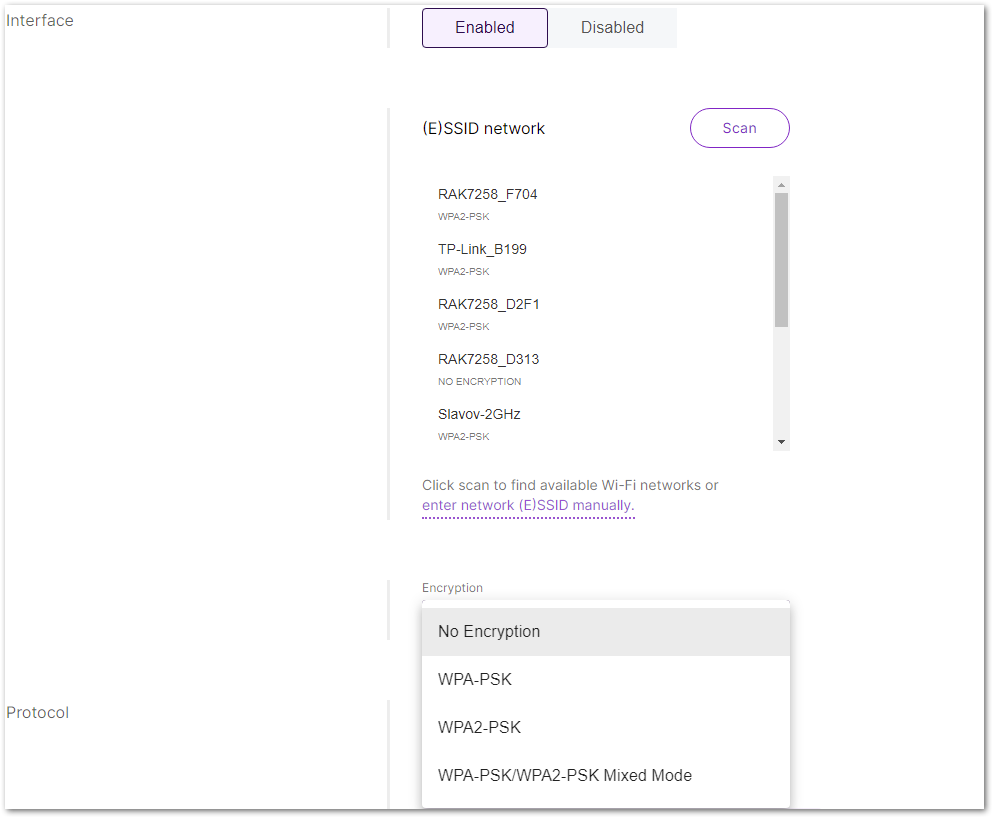
- Select the right Encryption method and enter the correct Key.
💡 Assuming you have entered the correct parameter values, you should receive an IP address assigned by your Wi-Fi router's (AP) built-in DHCP server. You can use this new IP address to log in via a web browser (the same way as in AP mode).
Connect Through Ethernet/PoE
To access the Internet through the ETH (PoE) port, make sure you have completed the steps defined in the Connect the PoE Adapter section.
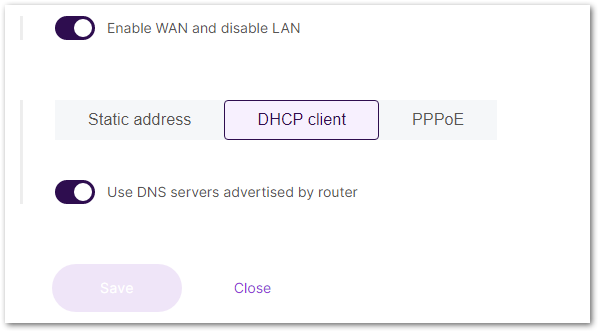
- Connect one end of an Ethernet cable to the LAN port on the PoE adapter, and the other end to your router. The router's DHCP server should assign an IP Address to the gateway.

-
Connect your PC to the LAN router.
-
Now, you can access the assigned IP to access the gateway. You can change the default settings if you wish.
Connect Through Cellular
SentiGate supports cellular connection. Make sure you have inserted a SIM card before using the cellular network.
- Access the gateway's Web UI. Navigate to Network > WAN > Cellular.
- Expand the Cellular block and click on Settings. Make sure the Interface is enabled.

- If necessary, you can configure the following parameters based on the information provided by the network operator.
