![Logo_quer_farbig.png]](https://docs.sentinum.de/hs-fs/hubfs/Logo_quer_farbig.png?height=40&name=Logo_quer_farbig.png)
- General Description of the LoRaWAN Interface
- Hardware Description
- Installation and Configuration
- LoRaWAN Function Overview
- Configuration of Measurement Data Transmission
- Uplink Message
- Standard Uplink
- Measurement Value Registers and Status Codes
- Status Codes
1. General Description of the LoRaWAN Interface
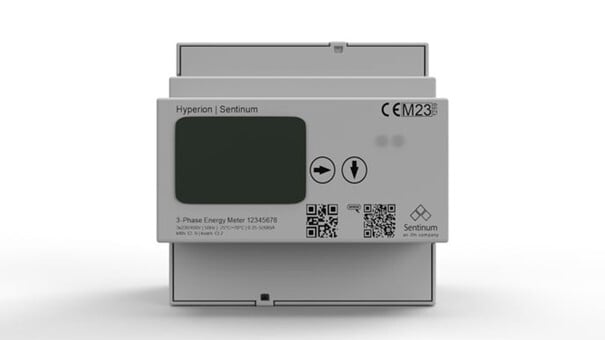
- The Hyperion LoRa is compatible with LoRaWAN® 1.0.3 (Class C).
- The Hyperion LoRa permanently stores all parameters required for LoRaWAN® and their configuration on the LoRa module.
- Reparameterization is only possible via the meter display or via a LoRaWAN® downlink message .
-
The Hyperion LoRa automatically synchronizes its internal clock
at least once a day via a
regularly scheduled
DeviceTimeReq. - The Hyperion LoRa automatically determines and optimizes its transmission parameters, such as data rate and spreading factor (SF).
- By default, the meter is equipped with an internal antenna. A version with an external antenna is available upon request.
- Operation of the Hyperion LoRa with an SMA connector is permitted only when an antenna is connected.
- The external antenna is disabled by default.
- An improperly installed antenna can damage the Hyperion.
2. Hardware Description
The Hyperion LoRa's LoRaWAN® interface is based on the LoRa wireless standard. This allows measurement data to be reliably transmitted even over long distances, even in environments without a permanent communication connection.
To ensure a stable and high-performance connection to the LoRaWAN® gateway, the meter continuously and automatically adjusts its transmission and reception parameters.
For easy integration into a network, the current connection status can be displayed directly on the meter's screen.
- Frequency range: EU 863–870 MHz
- Device type: LoRaWAN® Class C
- Two-way communication
- The LoRaWAN® interface is available at all times for downlink messages (Class C) .
- Transmit power: 14 dBm
Connecting an external antenna
To connect an external antenna to the SMA connector, use an antenna with an SMA connector.
When using an external antenna, the corresponding option must be enabled on the meter.
- The use of an RP-SMA antenna (even with an adapter) is not recommended.
- If the Hyperion LoRa is operated on a LoRaWAN® network without Class C support, the device automatically functions as a Class A endpoint.
- The Hyperion LoRa uses an adaptive data rate (ADR). Its use as a roaming device should therefore be carefully evaluated in advance.
3. Installation and Configuration
This section covers safety precautions during installation, antenna setup, and the necessary configuration steps before commissioning the Hyperion LoRa measuring device.
- Ensure that, before installing an external antenna, all power and voltage connections are disconnected.
- Ensure that the SMA connector is properly connected. The maximum tightening torque for the lock nut must not exceed 1 Nm.
Commissioning
Each meter is shipped with the following parameters:
- Join mode: OTAA
- Device EUI (starting with 10 2C EF)
- AppKey
-
JoinEUI
(formerly AppEUI):
10 2C EF 00 00 00 00 00
The Device EUI and the AppKey can be read directly from the display of the meter.
The JoinEUI (formerly AppEUI) is the same for every meter:
10 2C EF 00 00 00 00 00- Make sure the meter is connected correctly (phase sequence, conductor sequence, and direction of energy flow).
- Ensure that the current and voltage transformer ratios for transformer meters have been configured correctly.
The Hyperion LoRa is used to quickly identify potential issues regarding connection quality and data throughput.
The LoRaWAN® gateway can be repositioned even after the Hyperion LoRa has been installed.
As long as the recommended distances and radio conditions are maintained, the meter will continue to communicate with the LoRaWAN® network server.
Operation of a device with an SMA connector is permitted only permitted with the antenna connected.
4. LoRaWAN Feature Overview
LoRa JoinStatus 2/4
Display information:
- Joined: Indicates whether the meter is connected to a LoRaWAN® network .
- Uplink: ACK / NACK (with or without acknowledgment)
- Timestamp of the last uplink
LoRa Status 3/4
Display Information:
- RSSI: Received signal strength
- SNR: Signal-to-noise ratio
- SF: Spreading factor
- BW: Bandwidth
LoRa JoinMode 4/4
Display information:
- Join Mode: OTAA or ABP
- Downlink: ACK / NACK (with or without acknowledgment)
- Timestamp of the last downlink
LoRa AppKey (OTAA only)
Pressing the SRVC button briefly displays the currently stored AppKey.
Use the Right Arrow button to generate a new AppKey.
- Pressing the SRVC button briefly a second time (< 2 s) exits edit mode without changing the AppKey.
- A second long press (> 2 s) of the SRVC button confirms the generation of the new AppKey and automatically exits edit mode.
- The successful generation of a new AppKey is confirmed by a brief flash of the display backlight .
The newly generated AppKey can then be displayed by briefly pressing the SRVC button .
LoRa DevAddr (ABP only)
Pressing the SRVC button briefly displays the current DevAddr.
Use the Right Arrow button to generate a new DevAddr.
- A second short press (< 2 s) of the SRVC button exits edit mode, without changing the DevAddr.
- A second long press (> 2 s) of the SRVC button confirms the generation of the new DevAddr and automatically exits edit mode.
- The successful generation of a new DevAddr is confirmed by a brief flash of the display backlight .
The newly generated DevAddr can then be displayed by briefly pressing the SRVC button .
LoRa NwkSKey (ABP only)
Pressing the SRVC button briefly displays the current NwkSKey.
Use the Right Arrow button to generate a new NwkSKey.
- Pressing the SRVC button a second time briefly (< 2 s) exits edit mode, without changing the NwkSKey.
- Pressing the SRVC button confirms the generation of the new NwkSKey and automatically exits edit mode.
- The successful generation of a new NwkSKey is confirmed by a brief flash of the display backlight .
The newly generated NwkSKey can then be displayed by briefly pressing the SRVC button .
LoRa JoinMode (available with OTAA and ABP)
The parameter can be edited by briefly pressing the SRVC button.
Use the Right Arrow button to select from the available JoinMode options.
- Pressing the SRVC button exits edit mode, without changing the JoinMode.
-
A second long press (> 2 s) of the
SRVC button saves the new JoinMode and automatically exits edit mode.
Successful saving is confirmed by a brief flash of the display backlight.
After successfully changing the JoinMode, the new keys and connection parameters must be stored on the LoRaWAN® network server.
OTAA – Over-the-Air Activation
The LoRaWAN® interface of the Hyperion energy meter supports the OTAA (Over-the-Air Activation).
The communication module automatically handles authentication and encryption with the LoRaWAN® network server and connects to the network on its own.
There is exclusively a 1:1 connection between the Hyperion meter and the LoRaWAN® network . This type of communication offers enhanced protection against unauthorized access and interference by third parties.
LoRa Join
Performs a (renewed) network join.
The parameter can be selected by briefly pressing the SRVC button.
Use the Right Arrow button to select the Reboot option.
- A second short press (< 2 s) of the SRVC button exits edit mode without saving any changes.
- A second long press (> 2 s) of the SRVC button restarts the join process and automatically exits edit mode.
- Successful saving is confirmed by a brief flash of the display backlight.
LoRa Test
Immediately sends an uplink message with the configuration of Slot 1 to the LoRaWAN® network.
The parameter can be selected by briefly pressing the SRVC button.
The uplink is triggered with the Right Arrow button.
- A second short press (< 2 s) of the SRVC button exits edit mode without applying any changes.
- A second long press (> 2 s) on the SRVC button starts the uplink and exits edit mode automatically.
- A successful transmission is confirmed by a brief flash of the display backlight.
- This uplink can only be sent if Slot 1 is marked as active.
- This uplink can only be sent if no duty cycle restrictions are active.
LoRa antenna
Allows switching between the internal and external antennas.
To adjust this setting, briefly press the SRVC button. Use the "Right Arrow" button to select the desired antenna configuration.
- Pressing the SRVC button again briefly (< 2 s) exits edit mode without saving the selection .
- Pressing and holding the SRVC button again (> 2 s) saves the selection and automatically exits edit mode . Successful saving is confirmed by a brief flash of the display backlight.
- Ensure that the meter is de-energized when installing the external antenna.
- The meter may be damaged if the installation instructions are not followed.
- Follow the installation instructions carefully.
- The external antenna must be connected before this setting is changed.
LoRa Interface
Enables a soft reset (SoftReset) of the LoRa module or a reset to the factory settings (Factory Reset).
To configure this setting, briefly press the SRVC button. Use the "Right Arrow" button to select the desired reset function.
- Pressing the SRVC button briefly again (< 2 s) exits edit mode without making any changes .
- Pressing and holding the SRVC button again (> 2 s) executes the selected reset and automatically exits edit mode. A successful reset is confirmed by a brief flash of the display backlight.
Resetting the LoRa module does not affect measured values, meter readings, or other measurement-related functions of the Hyperion LoRa. All measurement data remains unchanged .
Join Request
Until a successful join operation has been performed, the Hyperion LoRa periodically attempts to establish a connection to a LoRaWAN® network.
Join requests are sent at random intervals within a time window of approximately 10 minutes. This helps reduce bandwidth bottlenecks when multiple meters are operated simultaneously on the same network.
The uplink and downlink counters are reset to 0 after a restart of the Hyperion LoRa.
LoRa Connection Test
The Hyperion LoRa checks its connection to the LoRaWAN® network at least once a day.
Optionally, data packets can be configured so that an ACK confirmation is requested for every uplink transmission.
If this feature is enabled, the meter can respond significantly faster to connection interruptions.
The Hyperion LoRa automatically initiates a new (re)join process if:
- no ACK acknowledgment for uplink messages is received within 24 hours,
- or the daily check of the connection to the LoRaWAN® network fails.
The existing network connection can be checked via time synchronization using DeviceTimeReq or via an uplink message to a dedicated fPort with ACK confirmation.
The Hyperion LoRa energy meter can acknowledge every received downlink transmission.
5. Configuration of Meter Reading Transmission
General Description
- A downlink message can be used to configure which meter readings are transmitted and at what intervals.
- Only measurement values from the data logger and the logbook are available for retrieval.
- Ten so-called slots are available for configuration; these are mapped to fPorts 1 through 10.
- A maximum of 10 measured values can be stored per slot.
- Slots with lower numbers have higher priority.
- By default, the measurement registers defined under Standard Uplink are transmitted.
- The transmission interval can be freely configured. Intervals ranging from 1 minute to a maximum of 67,500 minutes (approx. 45 days) .
-
You can specify whether the LoRaWAN® network should
acknowledge each transmission with an ACK.
- If this option is enabled, the meter resends a data packet if no acknowledgment is received from the network.
- For each profile, you can define whether it should be active or inactive.
- If only the transmission interval is changed, the downlink message contains only the two interval bytes and the flags for ACK and Active, but no additional register information.
- If the meter's allowed transmission time is insufficient for the intended data volume, the transmission may only be partially completed or not at all .
Downlink Messages
The Hyperion LoRa Energy Meter can acknowledge every received downlink transmission.
Description of the Downlink Message
The bit order follows the LSB format (Least Significant Bit), the byte order is in Little-Endian format.
The downlink message is used to configure which metering registers are to be transmitted.
Length: 4 to 13 bytes
fPort: 110
| Byte | Description | Example |
|---|---|---|
0–1 |
Time interval in minutes | 0x01 0x00 0xFF 0xFF |
2 |
Configuration Flags | – |
3–12 |
Register IDs of the measured values to be transmitted | 0x03 ... |
– |
CRC8 checksum | See definition |
Configuration flag byte
| Byte | Bit | Description |
|---|---|---|
00000000 |
1 | Settings unchanged |
00000000 |
2 | No ACK is expected after the upload |
00000010 |
2 | ACK expected for every upload |
00000100 |
3 | Reconnect to an existing or new network after approximately 60 minutes |
00000000 |
3 | Undefined |
00001000 |
4 | Connection disabled |
00000000 |
4 | Connection enabled |
00010000 |
5 | Undefined |
00000000 |
5 | Undefined |
00100000 |
6 | Undefined |
00000000 |
6 | Undefined |
01000000 |
7 | Undefined |
00000000 |
7 | Undefined |
A list of available register IDs can be found in the chapter Measurement Register.
- If only bytes 0 and 1—the config byte and the CRC8 checksum—are transmitted, only the transmission interval and the configuration flags are changed.
- The configured measurement registers remain unchanged.
Example of a 1-minute interval setting
var data = [0x01, 0x00, 0x08, 0x53];-
0x01 0x00→ 1-minute interval -
0x08→ No ACK, no re-join, port active -
0x53→ CRC-8 checksum
Example of register transmission
This example shows the required downlink for the cyclic transmission of energy registers Active & Reactive Energy Import & Export Tariff 1 & 2 at one-minute intervals.
var data = [0x01, 0x00, 0x0A, 0x01, 0x03, 0x04, 0x05, 0x06, 0x07, 0x08, 0x09, 0x0A, 0x83];-
0x01 0x00→ 1-minute interval -
0x0A→ ACK enabled, no re-join, port active -
0x01→ Timestamp -
0x03 – 0x0A→ Registers selected for the uplink -
0x83→ CRC-8 checksum
6. Uplink message
The following messages can be sent by the Hyperion LoRa :
- Join/Rejoin Request
- Time Synchronization
- Network Membership Monitoring
- Transmission of Measurement Registers
Join / Rejoin
The Hyperion LoRa performs a join or rejoin operation with a LoRaWAN® network.
DeviceTimeReq / Time Synchronization
During normal operation, the Hyperion LoRa periodically attempts to synchronize the current time and date at least once every 24 hours and no more than once per hour.
The following rules apply to adopting the new time:
- If the previous and new times differ by less than 2 seconds, the meter adopts the new time directly as the valid time synchronization.
- If the difference is more than 2 seconds, the meter requests the current time at least three more times to verify the accuracy of the received time.
After the device is powered on or when the internal RTC buffer has been exhausted, the meter performs at least three DeviceTimeReq requests.
These three time queries are executed within a period of approximately three minutes.
- The operator of the LoRaWAN® infrastructure must ensure that the meter can synchronize its time regularly to ensure the proper operation of the Hyperion energy meter.
-
The LoRaWAN® command
DeviceTimeReqis the recommended solution for this.
Sending Meter Readings
- The Hyperion LoRa transmits the requested register values directly from its data logger via LoRaWAN®, without .
- The requested measurement values are read from the data logger at the respective transmission time.
- The transmission must begin and be completed within the configured transmission interval.
Example of a 15-minute transmission interval:
- 9:00:02 a.m.: The LoRa communication module reads the last data logger entry. The stored values are from 9:00:00 a.m.
- 9:00:03 a.m. to 9:14:59 a.m.: The meter attempts to transmit the data via the LoRaWAN® network .
- 9:15:02 a.m.: The LoRa communication module reads the next data log entry. The stored values are from 9:15:00 a.m.
- When operating multiple meters within the same LoRaWAN® network, transmissions may overlap.
- If the Hyperion LoRa must delay transmissions due to network conditions, such as a high spreading factor (SF) or a low data rate, only one data packet is sent.
- Measurement values that were not transmitted will not be resent at a later time. Therefore, ensure that both the meter and the LoRaWAN® network are designed for complete and timely data transmission.
Structure of Uplink Packets
The bit order is LSB, and the byte order is Little Endian. The first four bytes always contain the data logger's timestamp.
First telegram after joining a LoRaWAN® server
fPort: 100
Length: 29 bytes
Structure
| Byte | Description |
|---|---|
0-3 |
Current system time |
4 |
Type |
5-8 |
Serial number |
9 |
Type |
10 |
Meter type |
11 |
Type |
12-13 |
Primary current transformer |
14 |
Type |
15-16 |
Secondary current transformer |
17 |
Type |
18-19 |
Primary voltage transformer |
20 |
Design |
21-22 |
Secondary voltage transformer |
23 |
Design |
24-27 |
MID Certification Year (BCD) |
28 |
CRC (8-bit) |
Example of a packet:
# System time
# Serial number 22150405
# Meter type Converter Counter → 2
# Current transformer ratio 5:5
# Voltage transformer ratio 100:100
# MID year of certification 2022
CRC should be 0x65
| Data | Description |
|---|---|
VAR DATA = [0x68, 0x9B, 0xA8, 0x62
|
System time 0x62A89B68→ 1655217000 → Tuesday, June 14, 2022 → 4:30:00 PM GMT+02:00 (DST) |
0xF1, 0x05, 0x04, 0x15, 0x22
|
Serial number 0x22150405→ 22150405 |
0xF7, 0x02
|
Meter type 0x02→ 2 |
0xF3, 0x05, 0x00
|
Primary current transformer 0x0005→ 5 |
0xF4, 0x05, 0x00
|
Secondary current transformer 0x0005→ 5 |
0xF5, 0x64, 0x00
|
Primary voltage transformer 0x0064→ 100 |
0xF6, 0x64, 0x00
|
Secondary voltage transformer 0x0064→ 100 |
0xF8, 0x02, 0x00, 0x02, 0x02
|
MID Certification Year (BCD) → 2022 |
0x65]
|
CRC-8 checksum |
7. Standard Uplink
After the first startup or after resetting to factory defaults, the meter sends the following telegram:
- fPort: 1
- Length: 27 bytes
- Interval: Every 15 minutes, the most recent entry from the meter's data logger is transmitted.
Structure:
| Byte | Description | Example |
|---|---|---|
0–3 |
Timestamp | 0x03 |
4 |
Type | – |
5–8 |
Active Energy Import L123 Tariff 1 | 0x04 |
9 |
Type | – |
10–13 |
Active Energy Import L123 Tariff 2 | 0x05 |
14 |
Type | – |
15–18 |
Active Energy Export L123 Tariff 1 | 0x06 |
19 |
Type | – |
20–23 |
Active energy export L123 Tariff 2 | 0x07 |
24 |
Type | – |
25 |
Error code | 0xFF |
26 |
8-bit CRC | – |
The fPorts 1–10 can be customized individually, as described in Chapter Downlink Messages.
8. Measurement Value Registers and Status Codes
Measurement Value Registers
The energy measurements and technical information are read from the Hyperion energy meter's data logger and transmitted via LoRa. The measurement values are stored at the end of each measurement period (15 minutes).
- Changes to the Hyperion's configuration, e.g., the current transformer ratio, are not updated in the data logger until the end of a measurement period.
| ID | Type | Description | Unit | Resolution |
|---|---|---|---|---|
0x00 | uInt32 | Index | Index | |
0x01 | uInt32 | Timestamp | Time | Epoch |
0x02 | uInt32 | Original timestamp of the entry | Time | Epoch |
0x03 | uInt32 | Effective energy import L123 T1 | Wh | 1 Wh |
0x04 | uInt32 | Effective energy import L123 T2 | Wh | 1 Wh |
0x05 | uInt32 | Effective Energy Export L123 T1 | Wh | 1 Wh |
0x06 | uInt32 | Effective energy export L123 T2 | Wh | 1 Wh |
0x07 | uInt32 | Reactive energy imports L123 T1 | varh | 1 varh |
0x08 | uInt32 | Reactive energy imports L123 T2 | varh | 1 varh |
0x09 | uInt32 | Reactive power exports L123 T1 | varh | 1 varh |
0x0A | uInt32 | Reactive power export L123 T2 | varh | 1 varh |
0x0B | Int32 | Actual power L123 | W | 1 W |
0x0C | Int32 | Actual power L1 | W | 1 W |
0x0D | Int32 | Actual power L2 | W | 1 W |
0x0E | Int32 | Actual power | W | 1 W |
0x0F | Int32 | Electricity L123 | mA | 1 mA |
0x10 | Int32 | Current L1 | mA | 1 mA |
0x11 | Int32 | Electricity L2 | mA | 1 mA |
0x12 | Int32 | Electricity L3 | mA | 1 mA |
0x13 | Int32 | Current L4 (neutral conductor, only for current transformer meters) | mA | 1 mA |
0x14 | Int32 | Voltage L1-N | V | 100 mV |
0x15 | Int32 | Voltage L2-N | V | 100 mV |
0x16 | Int32 | Voltage L3-N | V | 100 mV |
0x17 | Int8 | Power factor L1 | -1..1 | 0.01 |
0x18 | Int8 | Power Factor L2 | -1..1 | 0.01 |
0x19 | Int8 | Power Factor L3 | -1..1 | 0.01 |
0x1A | Int16 | Frequency | Hz | 0.1 Hz |
0x1B | uInt32 | Average power | W | 1 W |
0x1C | uInt32 | Effective energy import L123 T1 | kWh | 1 kWh |
0x1D | uInt32 | Effective energy import L123 T2 | kWh | 1 kWh |
0x1E | uInt32 | Effective energy export L123 T1 | kWh | 1 kWh |
0x1F | uInt32 | Effective energy export L123 T2 | kWh | 1 kWh |
0x20 | uInt32 | Reactive Energy Import L123 T1 | kvarh | 1 kvarh |
0x21 | uInt32 | Reactive power import L123 T2 | kvarh | 1 kvarh |
0x22 | uInt32 | Imported reactive power L123 T1 | kvarh | 1 kvarh |
0x23 | uInt32 | Imported reactive power L123 T 2 | kvarh | 1 kvarh |
0x24 | uInt64 | Net energy import L123 T1 | Wh | 1 Wh |
0x25 | uInt64 | Import work L123 | Wh | 1 Wh |
0x26 | uInt64 | Effective energy exports L123 T1 | Wh | 1 Wh |
0x27 | uInt64 | Effective energy exports L123 T2 | Wh | 1 Wh |
0x28 | uInt64 | Reactive energy imports L123 T1 | varh | 1 varh |
0x29 | uInt64 | Reactive energy imports L123 T2 | varh | 1 varh |
0x2A | uInt6 4 | Reactive power exports L123 T1 | varh | 1 varh |
0x2B | uInt64 | Reactive power exports L123 T2 | varh | 1 varh |
0xF0 | uInt8 | Error code | ||
0xF1 | uInt32 | Hex serial number | ||
0xF2 | uInt32 | Hex system number | ||
0xF3 | uInt16 | Current transformer (primary side) | ||
0xF4 | uInt16 | Secondary current transformer | ||
0xF5 | uInt16 | Primary voltage transformer | ||
0xF6 | uInt16 | Secondary voltage transformer | ||
0xF7 | uInt8 | Meter type | ||
0xF8 | uInt32 | MID year of certification | BCD | |
0xF9 | uInt32 | Year of manufacture | BCD | |
0xFA | uInt32 | Firmware version | ASCII | |
0xFB | uInt32 | MID -Measurement Version | ASCII | |
0xFC | uInt32 | Manufacturers | ASCII | |
0xFD | uInt32 | Hardware Index | ASCII | |
0xFE | uInt32 | Current System Time | Time | Epoch |
The possible values for the error code can be found in the chapter Status Codes.
9. Status Codes
| Section | Title |
|---|---|
| 1 | Introduction |
| 2 | Hardware |
| 3 | Installation and Commissioning |
| 4 | LoRaWAN Overview |
| 5 | Configuring Measurement Data Transmission |
| 6 | Uplink Message |
| 7 | Standard Uplink |
| 8 | Measurement Registers and Status Codes |